Raspberry Pi Pico Neopixel Controller w/ Motion Detection Trigger
Guide to making a ws2821b LED controller triggered by an infrared motion detector. This is powered by a Raspberry Pi Pico Microcontroller running micropython. Build details and guide + schematic.
I've been thinking of setting up lighting in my server rack for a while and bought a cheap neopixel-type LED strip on Amazon a few months ago that I just left and haven't really touched. I recently bought a few Raspberry Pi Picos for $2/each when they were on sale and decided to finally put one to use.
Here is what I ended up with (no fancy animations yet), lighting up when the door to the server rack is opened, triggered by an infrared motion sensor:
I wired this up with a buck convertor so it can accept any input voltage 5v to 24v and output a stable 5v for all the components. See more info about that convertor in the parts list below.
Schematic
Raspberry Pi Pico Neopixel Controller w/ Motion Detection TriggerHere are some notes about the schematic - this is a pretty common build:
- 1000 microfarad capacitor (from this set) is added across the +/- terminals of the LED strip - this helps provide a more stable current to prevent damaging the pixels
- 470 ohm resistor (from this set) between the digital connection of the LED strip and the microcontroller - this is not listed in some schematics - but I saw lots of errors and weird behavior without it, so I would definitely include it
- External power supply vs USB power: depending on the length of the LED strip/power draw of your animations you might be able to power it by USB, but it isn't recommended, as if you are pulling too much power you might damage a USB port if it isn't adequately protected
The Build
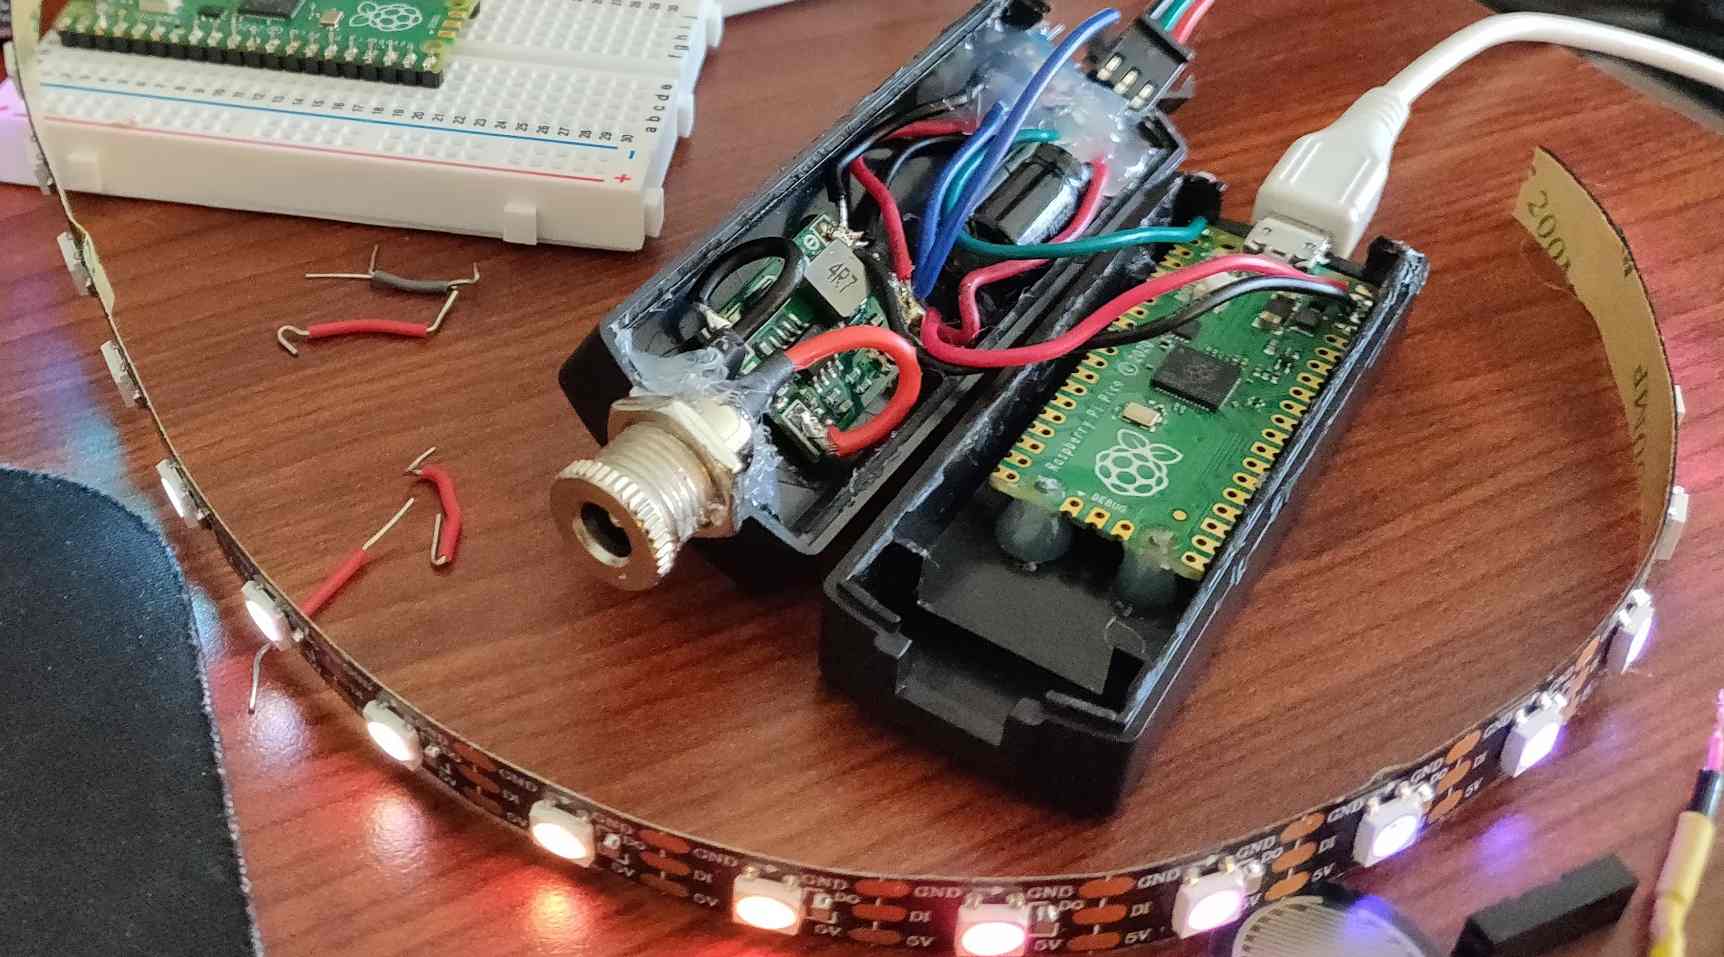
Power Supply and Case
The case was salvaged from a defective PoE splitter - I removed the actual components to use elsewhere and had a nice-sized case for a microcontroller left over.
Raspberry Pi Pico Neopixel Controller w/ Motion Detection TriggerI hot-glued in the jack and pins, soldered the convertor and then hot-glued that in.
Then I fit the Pico microcontroller on the other side and hot-glued that. I wanted to be able to access the pins and USB port cleanly while the device is sealed up.
Installing and Wiring the Microcontroller
Raspberry Pi Pico Neopixel Controller w/ Motion Detection TriggerI wired up and soldered the following connections per the schematic:
- 1000 microfarad capacitor +/- to external pin 1 and 3
- 5V and GND from convertor out to external pin 1 and 3
- Digital Out from Pico PIO 0 to external pin 2
- 5V and GND from convertor out to external pin 4 and 6
- Digital Out from Pico GPIO 22 to 470 ohm resistor to external pin 5
- 5V and GND from convertor out to VSYS and GND of Pico
Please take note as the wiring here is written out respectively - for example, 5v and GND to 1 and 3 means 5V to 1 and GND to 3. Make sure not to confuse polarity (matching +/-) in your circuit so you don't burn your components.
Testing it out, looking fancy with the lights working!
Raspberry Pi Pico Neopixel Controller w/ Motion Detection TriggerAdd in a resistor between the Digital out of the LED strip and the MCU. As mentioned above, this circuit can work without a resistor, but I believe it can damage the GPIO pin (not sure about this) but does seem to lead to errors and weird behavior without it.
Raspberry Pi Pico Neopixel Controller w/ Motion Detection TriggerSetting up the development environment
I found a guide by Chris Wood for developing with MicroPython for the Raspberry Pi Pico using his VSCode extension. It was extremely helpful and got me up and running quickly - this was my first go at using MicroPython.
Once you get set up with your development environment and can push code to the Pico, move on to the next step:
Writing the code for a motion-sensor trigger
Disclaimer: the code here was just hacked together to allow fade-in and fade-out of a white light, and isn't optimized in any way. Eventually if I improve it or optimize it, I'll update that here.
Luckily, there is a neopixel (ws2812b) example listed on the Raspberry Pi Pico getting started page, so it was really easy to get up and running. See the repo here.
The important takeaway from here is to add the ws2812b.py file to your project root.
See the code at the end of this article.
To install in the rack, I stuck the LED strip to a strip of cardboard and hot-glued that to the top of the rack. I then hot glued the IR sensor to the top right corner of the rack so it would be able to detect when the door is closed. Since the door is black and cool, the IR sensor didn't detect it until I taped a white piece of paper right where it meets with the sensor.
Raspberry Pi Pico Neopixel Controller w/ Motion Detection TriggerParts List
- Original PoE splitter - this was defective when I received it and Amazon asked me not to send it back, so I salvaged it for parts and used the case for this project
- Buck convertor 5v-24v to 3v-12v - this is a great little convertor but it is VERY sensitive when adjusting (unlike most others that require many turns of the pot to make changes). A tiny turn will result in a big voltage jump, very easy to burn these out so be careful when setting voltage
- ALITOVE 3.2ft 60 Pixels WS2812B Individual Addressable RGB LED Strip
- Infrared motion sensor
- Capacitors 0.1-1000 microfarad set - this is the set the capacitor I used came from
- Resistor set - this is where the 470 ohm resistor came from - really convenient set and well organized, easy to find resistors
- 22 awg wire 6 color set - very convenient for little projects like this. Still not sure if this type of wire is the best for this kind of project, it is very stiff and good for PCB boards (like hookup wire)
- Raspberry Pi Pico - I bought this in person at a store for $2/piece - not sure where to find it online at the moment - it looks like it is very overpriced on Amazon
- Soldering: I used this soldering iron which I've had for about a month now and really like so far. I used this flux with a syringe and this lead-free solder.
- Combo hot glue gun/sticks
Please note that I only link products that I have bought and tested myself, and some of the links above are Amazon affiliate links, which I earn a commission from (at no additional cost to the buyer).
Microcontroller Code
Here is the trigger fade in/fade out on motion detection script: